How to Master the Perfect Ombre Nail at Home
Hey there, nail enthusiasts! Imagine transforming your nails into a stunning gradient masterpiece without stepping foot in a salon. Ombre nails are all about that seamless blend of colors, creating a chic, eye-catching look that’s perfect for any occasion.
Whether you’re a beginner or a DIY pro, mastering the perfect ombre nail at home is easier than you think. In this guide, we’ll walk you through everything step by step, so you can achieve salon-worthy results right in your living room.
Let’s dive in and get those nails glowing!
Quick Steps That You Follow 💅👇
- Prep nails: Remove old polish, file, buff, and apply base coat.
- Paint base: Use your lightest color on the whole nail; let dry.
- Blend on sponge: Stripe polishes (light to dark) on a makeup sponge.
- Dab onto nail: Gently stamp from cuticle to tip for gradient effect; repeat as needed.
- Clean up: Fix edges with a remover-dipped brush. Finish: Add top coat for shine and longevity.
What You’ll Need for Ombre Nails at Home
Before you start blending colors, gather your supplies. Having everything ready makes the process smooth and fun. Here’s a simple list:
- Nail polish remover and cotton balls
- Nail clippers, file, and buffer
- Clear base coat
- Two or more nail polish colors (one light, one dark for the gradient)
- Makeup sponge (triangle-shaped works best)
- Liquid latex or tape (optional, for easy cleanup)
- Clear top coat
- Small brush or cotton swab for touch-ups
- Petroleum jelly (optional, to protect skin)
If you’re using gel polish, you’ll also need a UV/LED lamp and gel-specific products.
Preparing Your Nails: The Foundation for Perfection
A great ombre starts with prepped nails. Skipping this can lead to uneven results, so take your time.
First, remove any old polish with remover-soaked cotton balls. Trim and file your nails to your desired shape—rounded or square, it’s up to you.

Buff the surface lightly for smoothness, then push back cuticles gently. Apply a thin base coat and let it dry. This protects your nails and helps the color last longer.
Pro tip: Clean nails mean better adhesion, so wipe them with a bit of remover if they’re oily.
The Sponge Method: Classic Way to Do Ombre Nails at Home
The sponge technique is beginner-friendly and delivers that dreamy fade. It’s the go-to for most at-home ombre nails.
- Paint your nails with the lightest color as a base. Use two thin coats for even coverage, drying between each.
- On a makeup sponge, apply stripes of your colors side by side—lightest at the top, darkest at the bottom. Make sure they overlap slightly.
- Dab the sponge onto your nail, starting from the cuticle and rolling toward the tip. Repeat until the gradient looks seamless.
- Let it dry for a few minutes, then seal with a top coat. Clean up edges with a remover-dipped brush.
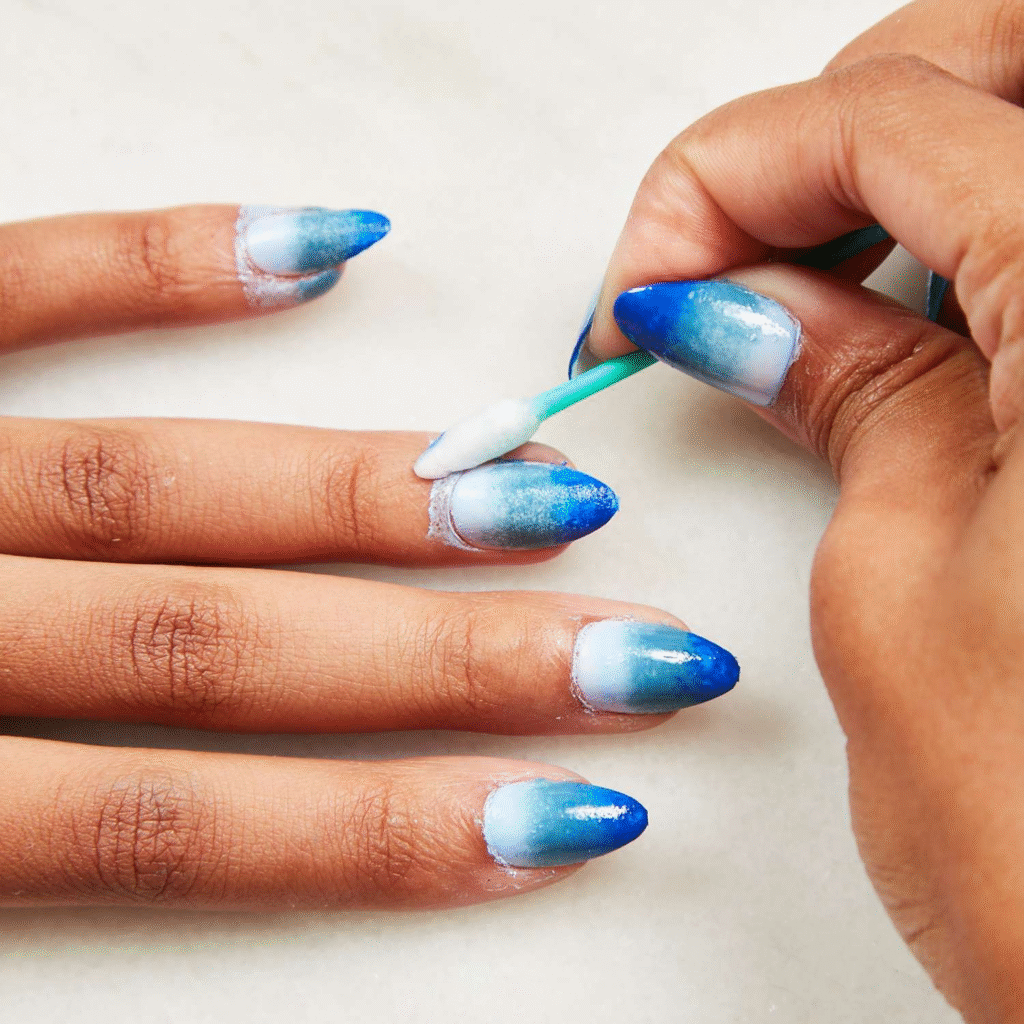
This method works wonders with regular polish. For a softer look, dampen the sponge first—it absorbs less polish.
The Brush Method: No-Sponge Alternative for Smooth Ombre
Hate the mess of sponges? Try the brush method for a cleaner, more controlled ombre nail at home. It’s ideal for gel polish but adapts to regular too.

- Apply your base coat and cure if using gel.
- Paint the lighter color over most of the nail, leaving the tip bare.
- With a thin liner brush dipped in clear gel or top coat, blend the edge where colors meet by tapping gently.
- Add the darker color to the tip and blend again. Cure or dry fully.
- Finish with a glossy top coat for that pro shine.
This no-sponge way reduces waste and gives a polished finish. Practice on one nail first to get the hang of it.
Tips and Tricks to Master the Perfect Ombre Nail
Want your ombre to pop? Here are some insider secrets:
- Choose complementary colors: Pastels for subtle, neons for bold.
- Work quickly: Polish dries fast, so reload your sponge as needed.
- Layer lightly: Thin coats prevent bubbling and speed drying.
- Protect your skin: Apply liquid latex around nails for easy peel-off cleanup.
- Experiment with angles: Tilt the sponge for unique fades, like vertical ombre.
- For gel users: Use sheer shades for easier blending and always cure between steps.
Patience is key—rushing leads to streaks, but practice makes perfect!
Common Mistakes to Avoid When Doing Ombre at Home
Even pros slip up, but here’s how to dodge pitfalls:
- Don’t overload the sponge; it causes blobs instead of blends.
- Avoid thick base coats—they can peel when stamping.
- Skipping top coat? Big no— it smooths texture and adds shine.
- Forgetting ventilation: Polish fumes are strong, so open a window.
Learn from these, and your ombre nails will turn out flawless every time.

Fun Variations and Ideas for Ombre Nails
Once you’ve mastered the basics, get creative! Ombre isn’t just two colors.
- Glitter ombre: Start with a base, then fade in sparkles for extra glam.
- Multi-color gradient: Use three shades for a rainbow effect.
- Reverse ombre: Dark at the cuticle, light at the tip for a twist.
- Seasonal spins: Pastel pinks for spring, deep reds for fall.
Mix in nail art like dots or stripes over the ombre for personalized flair. The possibilities are endless!
Wrapping Up: Your Path to Ombre Mastery
There you have it—your complete guide to mastering the perfect ombre nail at home. From prepping to blending, you’ve got the tools and steps to create stunning gradients that rival any salon. Remember, it’s all about practice and having fun with colors. Grab your polishes, try it out tonight, and show off your new skills. Who knows? You might just become the go-to nail artist among your friends. Happy blending!
FAQ’s
How to do perfect ombre nails?
To achieve perfect ombre nails, start with clean, prepped nails and use the sponge method: apply a light base color, dab blended shades on a makeup sponge for a seamless gradient, then seal with a top coat. Choose complementary colors, work in thin layers, and practice for that flawless fade—it’s all about patience and even blending!
How to do ombre step by step?
Prep nails: Remove old polish, file, buff, and apply base coat.
Paint base: Use your lightest color on the whole nail; let dry.
Blend on sponge: Stripe polishes (light to dark) on a makeup sponge.
Dab onto nail: Gently stamp from cuticle to tip for gradient effect; repeat as needed.
Clean up: Fix edges with a remover-dipped brush. Finish: Add top coat for shine and longevity.
Are ombre nails difficult to do?
No, ombre nails aren’t difficult—they’re beginner-friendly with practice! The sponge technique is simple and forgiving, though blending might take a couple tries to master. With basic tools like polish and a sponge, anyone can do it at home without pro skills.

